


一、springboot的定义
Spring Boot是伴随着Spring4.0共同诞生的,它的目的就是简化spring的配置及开发,并协助开发人员可以整体管理应用程序的配置而不再像以前那样需要做大量的配置工作,它提供了很多开发组件,并且内嵌了web应用容器,如tomcat和Jetty等。其目的便是使我们的开发变得简化并且能大幅度提高开发人员的开发效率,为了简化Spring功能的配置我们可以引入或启动我们需要的Spring功能。这样做的好处就是避免开发人员过多的对框架的关注,而把更多的精力与时间放在系统的业务逻辑代码中。
二、SpringBoot的作用
Spring Boot框架,其功能非常简单,便是帮助我们实现自动配置。我们都知道Spring Boot框架的核心是自动配置。只要有相应的jar包,Spring就会帮助我们实现自动配置,而无需像以前我们使用spring框架一样要做很多配置。当默认配置不能满足我们要求的时候,我们能够用自己的配置来替换这些自动的配置类。此外,上面我们也提到Spring Boot内嵌了web应用容器,除此之外还集成了系统监控等功能,这些都可以帮助我们快速搭建企业级的应用程序并使用。
三、Spring Boot的核心功能
- 可以不依赖tomcat等外部容器来独立运行的web项目,springboot的优点是能够以jar包的形式运行。
- 嵌入式的Servlet容器:我们不需要像以前那边先打个war包,然后再运行,在springboot看来这些都是多余的,我们可以选择他内嵌的tomcat、Jetty或者Undertow等容器来直接运行。
- 使pom文件配置更简化:我们只需要在 pom 文件中添加starter-web 依赖即可,无需像以前一样引入很多依赖而造成容易漏掉。
- 能够生产环境中直接使用性能指标、健康检查和应用信息等。
- springboot不需要任何xml文件配置而能实现所有的spring配置。
四、SpringBoot原理
1、我们使用IDEA开发工具创建一个springboot项目,我们看下pom文件依赖了什么?
<dependency>
    <groupId>org.springframework.boot</groupId>
    <artifactId>spring-boot-starter-web</artifactId>
</dependency>
spring-boot-starter-web会自动帮我们引入开发过程中所需要的web模块jar包,如包含了spring-web和spring-webmvc的依赖,好处就是我们不需要逐个的去导入,只需要导入一个就可以,这样可以避免遗漏或者版本问题,如下所示:
<dependency>
    <groupId>org.springframework.boot</groupId>
    <artifactId>spring-web</artifactId>
    <version>5.2.6.RELEASE</version>
</dependency>
<dependency>
    <groupId>org.springframework.boot</groupId>
    <artifactId>spring-webmvc</artifactId>
    <version>5.2.6.RELEASE</version>
</dependency>
2、SpringBootApplication类
@EnabIeTran5actionManaement
@SpringBootApplication
@ComponentScan(basePackages={"com.demo"})
@EnableCaching
public class SpringBootApplication {
    protected final static Logger logger = LoggerFactory.getLogger(SpringBootApplication.class);

    public static void main(String[] args) {
    	SpringApplication app = new SpringApplication(SpringBootApplication.class);
        app.setBannerMode(Banner.Mode.OFF);
	app.run(args);

        logger.info("SpringBootApplication is success!");
    }
}
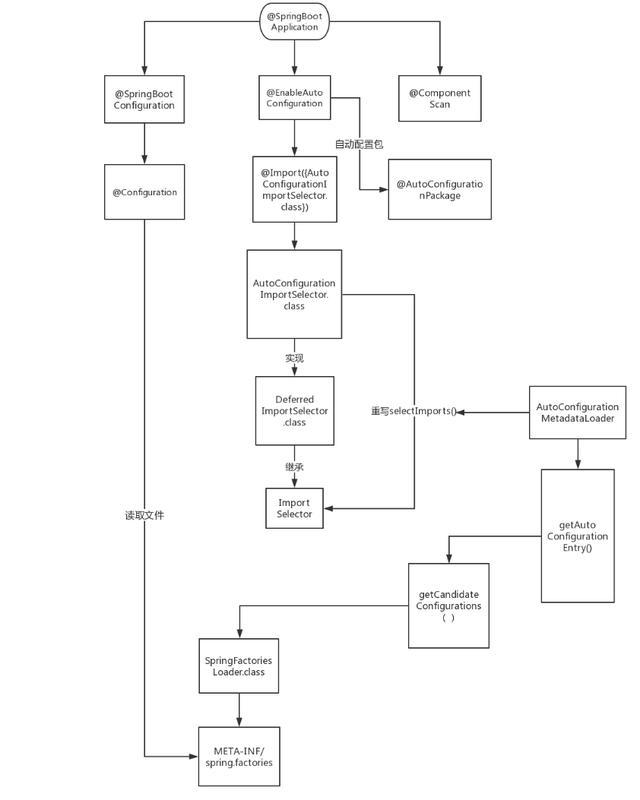
我们面试会经常被问到Springboot的核心注解是什么,这里我们来看下@SpringBootApplication,我们点进去可以看到包含了很多注解,其中@SpringBootConfiguration,@EnableAutoConfiguration,@ComponentScan这三个注解尤为重要。
/*
 * Copyright 2012-2019 the original author or authors.
 *
 * Licensed under the Apache License, Version 2.0 (the "License");
 * you may not use this file except in compliance with the License.
 * You may obtain a copy of the License at
 *
 *      https://www.apache.org/licenses/LICENSE-2.0
 *
 * Unless required by applicable law or agreed to in writing, software
 * distributed under the License is distributed on an "AS IS" BASIS,
 * WITHOUT WARRANTIES OR CONDITIONS OF ANY KIND, either express or implied.
 * See the License for the specific language governing permissions and
 * limitations under the License.
 */

package org.springframework.boot.autoconfigure;

import java.lang.annotation.Documented;
import java.lang.annotation.ElementType;
import java.lang.annotation.Inherited;
import java.lang.annotation.Retention;
import java.lang.annotation.RetentionPolicy;
import java.lang.annotation.Target;

import org.springframework.boot.SpringBootConfiguration;
import org.springframework.boot.context.TypeExcludeFilter;
import org.springframework.context.annotation.Bean;
import org.springframework.context.annotation.ComponentScan;
import org.springframework.context.annotation.ComponentScan.Filter;
import org.springframework.context.annotation.Configuration;
import org.springframework.context.annotation.FilterType;
import org.springframework.core.annotation.AliasFor;

/**
 * Indicates a {@link Configuration configuration} class that declares one or more
 * {@link Bean @Bean} methods and also triggers {@link EnableAutoConfiguration
 * auto-configuration} and {@link ComponentScan component scanning}. This is a convenience
 * annotation that is equivalent to declaring {@code @Configuration},
 * {@code @EnableAutoConfiguration} and {@code @ComponentScan}.
 *
 * @author Phillip Webb
 * @author Stephane Nicoll
 * @since 1.2.0
 */
@Target(ElementType.TYPE)
@Retention(RetentionPolicy.RUNTIME)
@Documented
@Inherited
@SpringBootConfiguration
@EnableAutoConfiguration
@ComponentScan(excludeFilters = {
		@Filter(type = FilterType.CUSTOM, classes = TypeExcludeFilter.class),
		@Filter(type = FilterType.CUSTOM,
				classes = AutoConfigurationExcludeFilter.class) })
public @interface SpringBootApplication {

	/**
	 * Exclude specific auto-configuration classes such that they will never be applied.
	 * @return the classes to exclude
	 */
	@AliasFor(annotation = EnableAutoConfiguration.class)
	Class<?>[] exclude() default {};

	/**
	 * Exclude specific auto-configuration class names such that they will never be
	 * applied.
	 * @return the class names to exclude
	 * @since 1.3.0
	 */
	@AliasFor(annotation = EnableAutoConfiguration.class)
	String[] excludeName() default {};

	/**
	 * Base packages to scan for annotated components. Use {@link #scanBasePackageClasses}
	 * for a type-safe alternative to String-based package names.
	 * @return base packages to scan
	 * @since 1.3.0
	 */
	@AliasFor(annotation = ComponentScan.class, attribute = "basePackages")
	String[] scanBasePackages() default {};

	/**
	 * Type-safe alternative to {@link #scanBasePackages} for specifying the packages to
	 * scan for annotated components. The package of each class specified will be scanned.
	 * <p>
	 * Consider creating a special no-op marker class or interface in each package that
	 * serves no purpose other than being referenced by this attribute.
	 * @return base packages to scan
	 * @since 1.3.0
	 */
	@AliasFor(annotation = ComponentScan.class, attribute = "basePackageClasses")
	Class<?>[] scanBasePackageClasses() default {};

}
@SpringBootConfiguration
当我们点进来他是这样的
/*
 * Copyright 2012-2017 the original author or authors.
 *
 * Licensed under the Apache License, Version 2.0 (the "License");
 * you may not use this file except in compliance with the License.
 * You may obtain a copy of the License at
 *
 *      https://www.apache.org/licenses/LICENSE-2.0
 *
 * Unless required by applicable law or agreed to in writing, software
 * distributed under the License is distributed on an "AS IS" BASIS,
 * WITHOUT WARRANTIES OR CONDITIONS OF ANY KIND, either express or implied.
 * See the License for the specific language governing permissions and
 * limitations under the License.
 */

package org.springframework.boot;

import java.lang.annotation.Documented;
import java.lang.annotation.ElementType;
import java.lang.annotation.Retention;
import java.lang.annotation.RetentionPolicy;
import java.lang.annotation.Target;

import org.springframework.context.annotation.Configuration;

/**
 * Indicates that a class provides Spring Boot application
 * {@link Configuration @Configuration}. Can be used as an alternative to the Spring's
 * standard {@code @Configuration} annotation so that configuration can be found
 * automatically (for example in tests).
 * <p>
 * Application should only ever include <em>one</em> {@code @SpringBootConfiguration} and
 * most idiomatic Spring Boot applications will inherit it from
 * {@code @SpringBootApplication}.
 *
 * @author Phillip Webb
 * @since 1.4.0
 */
@Target(ElementType.TYPE)
@Retention(RetentionPolicy.RUNTIME)
@Documented
@Configuration
public @interface SpringBootConfiguration {

}
@Configuration这个注解就是用来读取spring.factories文件
而上面我们所提到的@EnableAutoConfiguration注解@Configuration注解都具有配置的功能,那么他们两有什么区别呢?
@EnableAutoConfiguration注解使用的是自动配置机制,是自动导入,通俗的说就是在代码中自动import操作。
举个栗子说明一下吧,如果pom文件中配置了spring-boot-starter-web,那么他的jar包会放到类路径classpath里面,spring会自动配置tomcat和springmvc。这里如果不是自动配置的话,那么就需要我们手动配置下面的代码:
<servlet>
	<servlet-name>dispatcher</servlet-name>
	<servlet-class>org.springframework.web.servlet.DispatcherServlet</servlet-class>
	<init-param>
		<param-name>contextConfigLocation</param-name>
		<param-value>/WEB-INF/todo-servlet.xml</param-value>
	</init-param>
	<load-on-startup>1</load-on-startup>
</servlet>
<servlet-mapping>
    <servlet-name>dispatcher</servlet-name>
    <url-pattern>/<url-pattern>
</servlet-mapping>
如果我们使用了自动配置以后,这些配置代码就不需要再额外的去配置了。
@Configuration的作用是如果有自动导入的话那么肯定就会有自动导出,注意,这需要该类方法中的@bean注解,可以理解为xml中的bean配置,如下:
<beans>
	<bean id="demo1" class="spring.Demo1"/>
  	<bean id="demo2" class="spring.Demo2"/>
</beans>
如果类Demo1和类Demo2被其他类调用,我们只需要这样去做,如下:
public class Test {

	@Autowire
	private Demo1 demo1;

}
这就是@Configuration的自动导出作用
@ComponentScan的作用是告诉Spring哪个包下面的类用了这个注解,那么就会被spring自动扫描并且放入bean容器。
作者:学而生之
来源:http://www.360doc.com/content/20/0529/10/57127015_915286345.shtml
评论区